Installation
To install sinergym, follow these steps:
First, it is recommended to create a virtual environment. You can do so by:
$ sudo apt-get install python-virtualenv virtualenv
$ virtualenv env_sinergym --python=python3.7
$ source env_sinergym/bin/activate
Then, clone this repository using this command:
$ git clone https://github.com/jajimer/sinergym.git
Docker container
We include a Dockerfile for installing all dependencies and setting up the image for running sinergym.
By default, Dockerfile will do pip install -e .[extras], if you want to install a diffetent setup, you will have to do in root repository:
$ docker build -t <tag_name> --build-arg SINERGYM_EXTRAS=[<setup_tag(s)>] .
For example, if you want a container with only documentation libaries and testing:
$ docker build -t example1/sinergym:latest --build-arg SINERGYM_EXTRAS=[doc,test] .
On the other hand, if you don’t want any extra library, it’s neccesary to write an empty value like this:
$ docker build -t example1/sinergym:latest --build-arg SINERGYM_EXTRAS= .
Note
You can install directly our container from Docker Hub repository, all releases of this project are there.
Note
If you use Visual Studio Code, by simply opening the root directory and clicking on the pop-up button “Reopen in container“, all the dependencies will be installed automatically and you will be able to run sinergym in an isolated environment.
Manual installation
If you prefer installing sinergym manually, follow the steps below:
1. Install EnergyPlus 9.5.0
Firstly, install EnergyPlus. Currently it has been update compability to 9.5.0 and it has been tested, but code may also work with other versions. Sinergym ensure this support:
Sinergym Version |
EnergyPlus version |
|---|---|
1.0.0 or before |
8.6.0 |
1.1.0 or later |
9.5.0 |
Other combination may works, but they don’t have been tested.
Follow the instructions here and
install it for Linux (only Ubuntu is supported). Choose any location
to install the software. Once installed, a folder called
Energyplus-9-5-0 should appear in the selected location.
1. Install BCVTB software
Follow the instructions
here for
installing BCVTB software. Another option is to copy the bcvtb
folder from this
repository.
3. Set environment variables
Two environment variables must be set: EPLUS_PATH and
BCVTB_PATH, with the locations where EnergyPlus and BCVTB are
installed respectively.
4. Install the package
Finally, sinergym can be installed by running this command at the repo root folder:
$ pip install -e .
Extra libraries can be installed by typing pip install -e .[extras].
extras include all optional libraries which have been considered in this project such as
testing, visualization, Deep Reinforcement Learning, monitoring , etc.
It’s possible to select a subset of these libraries instead of ‘extras’ tag in which we select all optional libaries, for example:
$ pip install -e .[test,doc]
In order to check all our tag list, visit setup.py in Sinergym root repository.
In any case, they are not a requirement of the package.
Cloud Computing
1. First steps
You can run your experiments in cloud too. We are using Google Cloud in order to make it possible. Our team aim to set up a managed instance group (MIG) in which execute our Sinergym container.
Firstly, it is necessary that you have a Google Cloud account set up and SDK configured (auth, invoicing, project ID, etc). If you don’t have this, it is recommended to check their documentation. Secondly, It is important to have installed Docker in order to be able to manage these containers in Google Cloud.
You can link gcloud with docker accounts using the next (see authentication methods):
$ gcloud auth configure-docker
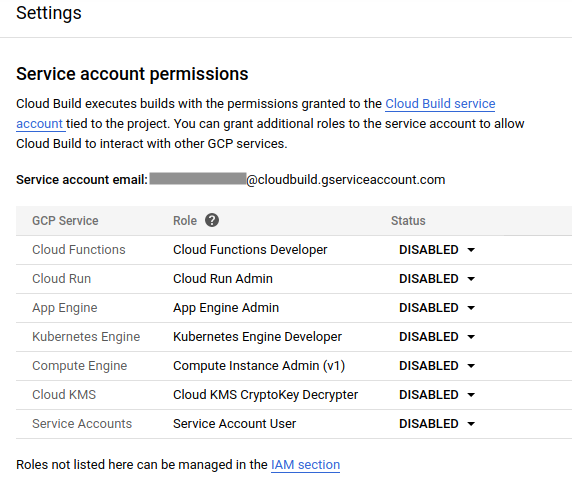
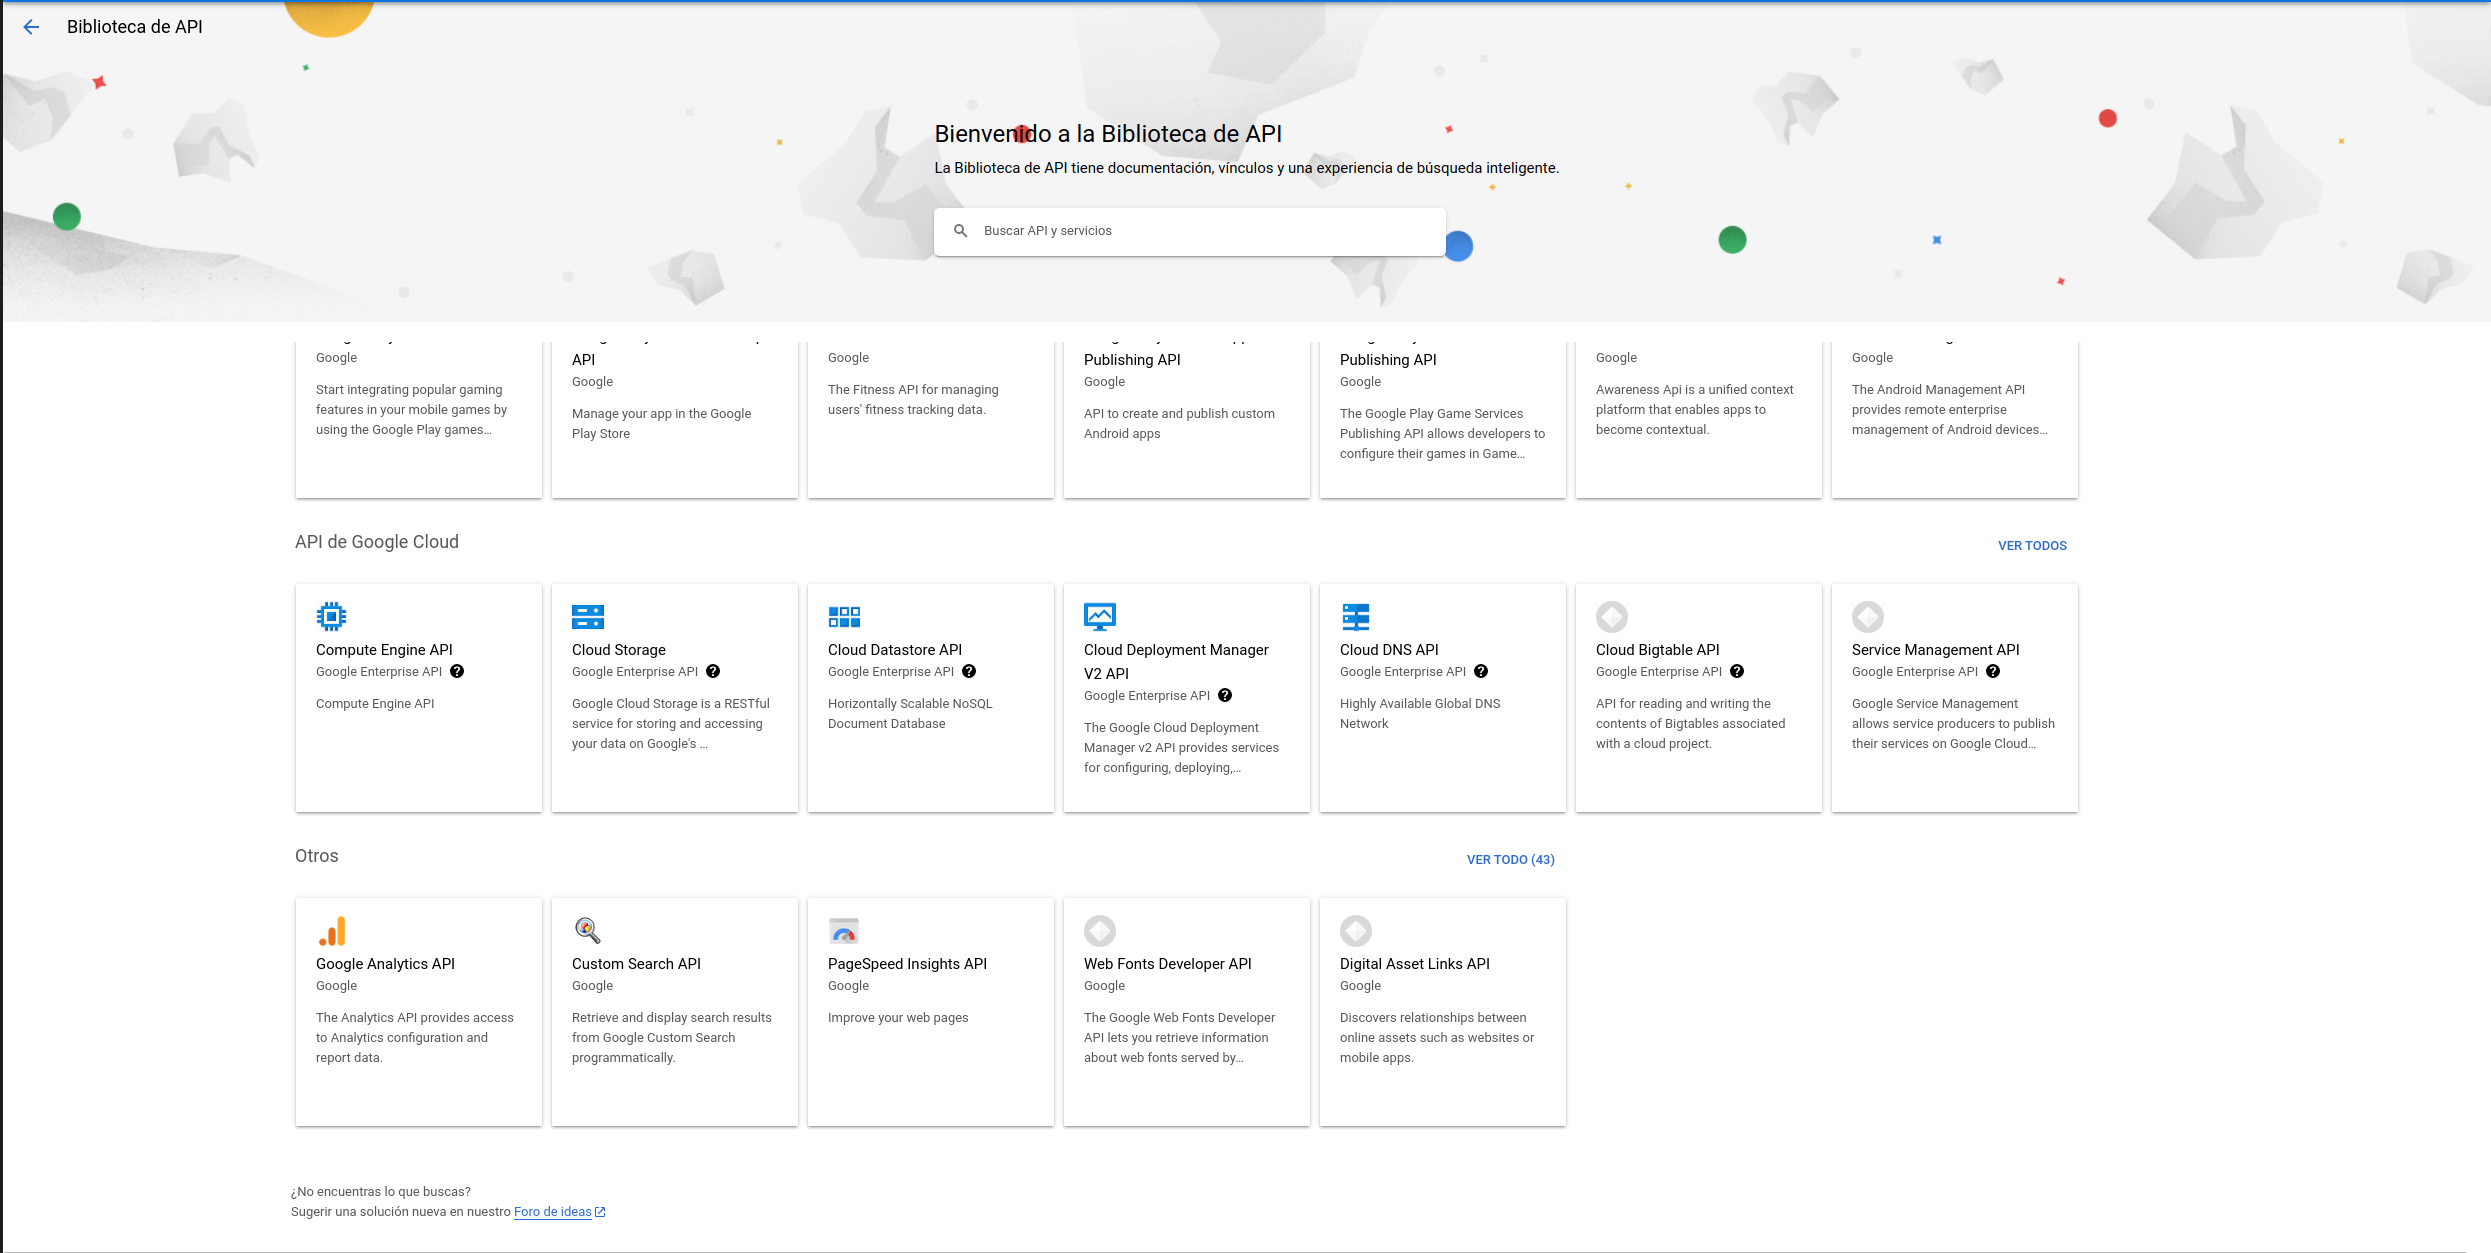
If you don’t want to have several problems in the future with the image build, we recommend you to allow permissions for google cloud build at the beginning (see this documentation). On the other hand, we are going to use specifically this services in Google Cloud Platform:
Google Container Registry API.
Artifact Registry API
Cloud Run API
Compute Engine API
Cloud Logging API
Cloud Monitoring API
Cloud Functions API
Cloud Pub/Sub API
Cloud SQL Admin API
Cloud Firestore API
Cloud Datastore API
Service Usage API
Cloud storage
Gmail API
Hence, you will have to allow this services into your Google account.


1. Use our container in Google Cloud Platform
Our Sinergym container is uploaded in container registry as a public one currently. You can use it locally:
$ docker run -it gcr.io/sinergym/sinergym:latest
If you want to use it in a GCE VM, you can execute the next:
$ gcloud compute instances create-with-container sinergym \
    --container-image gcr.io/sinergym/sinergym \
    --zone europe-west1-b \
    --container-privileged \
    --container-restart-policy never \
    --container-stdin \
    --container-tty \
    --boot-disk-size 20GB \
    --boot-disk-type pd-ssd \
    --machine-type n2-highcpu-8
We have available containers in Docker Hub too. Please, visit our repository
Note
It is possible to change parameters in order to set up your own VM with your preferences (see create-with-container).
Warning
--boot-disk-size is really important, by default VM set 10GB and it isn’t enough at all for Sinergym container.
This derive in a silence error for Google Cloud Build (and you would need to check logs, which incident is not clear).
1. Use your own container
Suppose you have this repository forked and you want to upload your own container on Google Cloud and to use it. You can use cloudbuild.yaml with our Dockerfile for this purpose:
steps:
  # Write in cache for quick updates
  - name: "gcr.io/google.com/cloudsdktool/cloud-sdk"
    entrypoint: "bash"
    args: ["-c", "docker pull gcr.io/${PROJECT_ID}/sinergym:latest || exit 0"]
    # Build image (using cache if it's possible)
  - name: "gcr.io/google.com/cloudsdktool/cloud-sdk"
    entrypoint: "docker"
    args:
      [
        "build",
        "-t",
        "gcr.io/${PROJECT_ID}/sinergym:latest",
        "--cache-from",
        "gcr.io/${PROJECT_ID}/sinergym:latest",
        "--build-arg",
        "SINERGYM_EXTRAS=[DRL,gcloud]",
        ".",
      ]

    # Push image built to container registry
  - name: "gcr.io/google.com/cloudsdktool/cloud-sdk"
    entrypoint: "docker"
    args: ["push", "gcr.io/${PROJECT_ID}/sinergym:latest"]

    # This container is going to be public (Change command in other case)
  # - name: "gcr.io/cloud-builders/gsutil"
  #   args:
  #     [
  #       "iam",
  #       "ch",
  #       "AllUsers:objectViewer",
  #       "gs://artifacts.${PROJECT_ID}.appspot.com",
  #     ]
#Other options for execute build (not container)
options:
  diskSizeGb: "10"
  machineType: "E2_HIGHCPU_8"
timeout: 86400s
images: ["gcr.io/${PROJECT_ID}/sinergym:latest"]
This file does the next:
Write in cache for quick updates (if a older container was uploaded already).
Build image (using cache if it’s available)
Push image built to Container Registry
Make container public inner Container Registry.
There is an option section at the end of the file. Do not confuse this part with the virtual machine configuration. Google Cloud uses a helper VM to build everything mentioned above.
Warning
In the same way VM needs more memory, Google Cloud Build needs at least 10GB to work correctly. In other case it may fail.
Warning
If your local computer doesn’t have enough free space it might report the same error (there isn’t difference by Google cloud error manager), so be careful.
In order to execute cloudbuild.yaml, you have to do the next:
$ gcloud builds submit \
    --config ./cloudbuild.yaml .
–substitutions can be used in order to configure build parameters if they are needed.
Note
“.” in --config refers to Dockerfile, which is necessary to build container image (see build-config).
Note
In cloudbuild.yaml there is a variable named PROJECT_ID. However, it is not defined in substitutions. This is because it’s a predetermined variable by Google Cloud. When build begins “$PROJECT_ID” is set to current value in gcloud configuration (see substitutions-variables).
4. Create your VM or MIG
To create a VM that uses this container, here there is an example:
$ gcloud compute instances create-with-container sinergym \
    --container-image gcr.io/sinergym/sinergym \
    --zone europe-west1-b \
    --container-privileged \
    --container-restart-policy never \
    --container-stdin \
    --container-tty \
    --boot-disk-size 20GB \
    --boot-disk-type pd-ssd \
    --machine-type n2-highcpu-8
Note
--container-restart-policy never it’s really important for a correct functionality.
Warning
If you decide enter in VM after create it immediately, it is possible container hasn’t been created yet. You can think that is an error, Google cloud should notify this. If this issue happens, you should wait for a several minutes.
To create a MIG, you need to create a machine set up template firstly, for example:
$ gcloud compute instance-templates create-with-container sinergym-template \
--container-image gcr.io/sinergym/sinergym \
--container-privileged \
--service-account storage-account@sinergym.iam.gserviceaccount.com \
--scopes https://www.googleapis.com/auth/cloud-platform, https://www.googleapis.com/auth/devstorage.full_control \
--container-env=gce_zone=europe-west1-b, gce_project_id=sinergym, MLFLOW_TRACKING_URI=http://$(gcloud compute addresses describe mlflow-ip --format='get(address)'):5000 \
--container-restart-policy never \
--container-stdin \
--container-tty \
--boot-disk-size 20GB \
--boot-disk-type pd-ssd \
--machine-type n2-highcpu-8
Note
--service-account, --scopes and --container-env parameters will be explained in Containers permission to bucket storage output.
Then, you can create a group-instances as large as you want:
$ gcloud compute instance-groups managed create example-group \
    --base-instance-name sinergym-vm \
    --size 3 \
    --template sinergym-template
Warning
It is possible that quote doesn’t let you have more than one VM at the same time. Hence, the rest of VM’s probably will be initializing always but never ready. If it is your case, we recommend you check your quotes here
1. Init your VM
Your virtual machine is ready! To connect you can use ssh (see gcloud-ssh):
$ gcloud compute ssh <machine-name>
Google Cloud use a Container-Optimized OS (see documentation) in VM. This SO have docker pre-installed with sinergym container.

To use this container in our machine you only have to do:
$ docker attach <container-name-or-ID>

And now you can execute your own experiments in Google Cloud! If you are interested in using our API specifically for Gcloud (automated experiments using remotes containers generation). Please, visit our section Sinergym Google Cloud API